The brassica or cabbage family is large and in addition to the obvious such as cabbage, brussels sprouts, cauliflower and kale includes radish, swede, turnip, kohlrabi, rocket and wallflowers, something to bear in mind when it comes to rotation and pest control. These notes however apply to cabbage, brussels sprouts, cauliflower, kale, calabrese and broccoli.
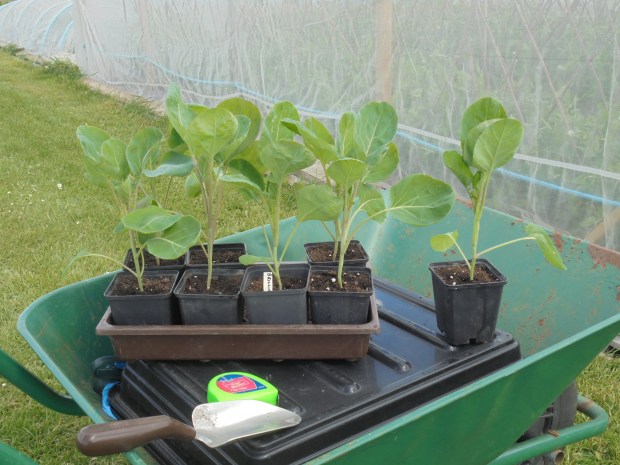
For those raising their own plants seed of brassicas can be sown at home using good compost in a 4” pot or half sized seed tray, once germinated prick out one seedling to a pot. I prick out into 68mm square pots which then fit either six to a half seed tray or fifteen to a full seed tray. January and February sowings would be best grown on in a greenhouse, March sowings should be fine in a cold frame. Grown on this way should give strong, heavily rooted plants. From sowing seed until the plant is ready for transplanting out into the allotment takes six to eight weeks.
Those not wishing to raise their own plants from seed might chose to buy plants ready for transplanting from garden centres, if so, do thoroughly check the growing tips and underside of leaves to ensure they are free of pests some of which are very small.
Ground preparation
Brassicas grow best in ground that has been well prepared beforehand, ideally dug or forked over the previous autumn or winter and allowed to settle.
Before transplanting out I apply a dressing of blood fish and bone about three handfuls per 24’ row plus, because brassicas are hungry a high nitrogen fertiliser such as chicken pellets or dried blood, again about three handfuls per 24’ row. An alternative nitrogen fertiliser is sulphate of ammonia, a trowelful per 24’ row, this is a useful fertiliser as it lowers our naturally high soil pH resulting in other minerals and elements being more readily available. Sulphate of ammonia is caustic so avoid getting it on your hands or on plant leaves and roots, don’t use it on soils that are pH neutral or less. Any fertiliser is best raked into the surface before planting so as to encourage roots to spread and search. Fertiliser put in a small planting hole does not have the same effect and could scorch roots.
When transplanting out into the allotment, dig a 5-inch-deep hole with a trowel and plant so the top of the root ball is slightly below ground level, firm and water in. For a couple of days give plants water particularly if the weather is dry, slug prevention is advisable.
Unfortunately, many pests are attracted to our brassicas and gardeners often consider pigeons and butterflies the most damaging probably because they are the most visible. However, at Ashbrook flea beetle, grey cabbage aphid, white fly, cabbage root fly, slugs and diamond backed moth are often around. It is normally flea beetle and diamond backed moth that are the most destructive.
Flea beetle thrives in hot dry weather but doesn’t like wet conditions. Some relief can be given to your plants by watering them during hot, dry weather with clean water from a can fitted with a rose to simulate a rain shower, as this creates damp soil slug precautions are advisable.
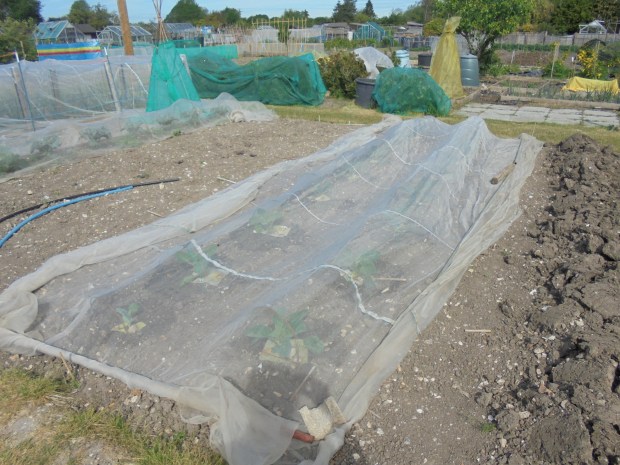
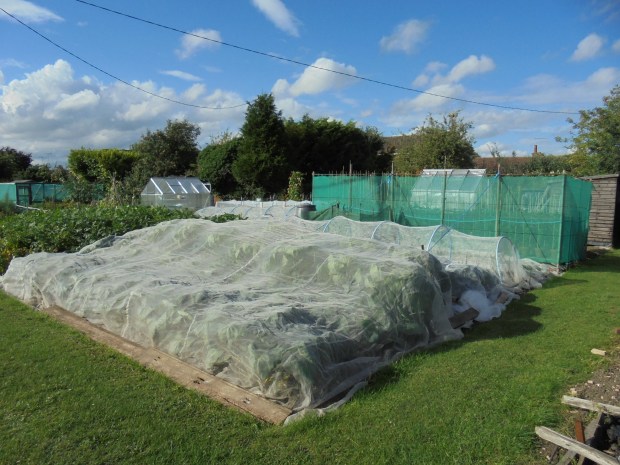
How plants are protected is up to the individual, plastic netting will keep pigeons off but not much else. I cover mine from planting to harvest and find by far the most effective protection is fine insect mesh, first check plants are pest free, then immediately they are transplanted apply slug protection then cover with fine insect mesh. Some gardeners create frames of timber or tubing to support the mesh which work well. Alternatively, put in some form of temporary support while the plants get established e.g., small wire hoops or short lengths of bamboo supporting plastic bottles then lay the mesh loose over the planted area, allowing plenty of slack around the edges to allow for future growth and to restrict access for crawling pests. The plants then gradually push the mesh up as they grow. For several reasons, plants grown under insect mesh perform far better than those grown beneath other materials. During the winter when most pests are hibernating it might be worth switching to a net with open mesh so as to reduce the risk of snow weight damage but to keep pigeons off.
Brassicas can be prone to the disease club root, to date I have not had a problem at Ashbrook probably due to the combination of naturally high pH and rotation.
Now consider individual types of brassica.
Cabbage
An often-derided vegetable but very versatile when sautéed, steamed or in a coleslaw.
Summer cabbage: – Sow seed in January, February and March, plant out 45cm (18”) apart with 60cm (24”) between rows from March onwards, very early plantings will benefit from cloche protection, as the weather warms up remove cloches and replace with insect mesh. Golden Acre, a round Primo type and Greyhound a good pointed cabbage both give good crops.
Late summer/autumn cabbage: – Sow seed mid-April/early May, plant out during June/early July 45cm apart. For many years I grew Winnigstadt but this one seems to be disappearing from most seed catalogues so recently I have grown Monarchy, both are very good pointed cabbages, for a round summer cabbage Golden Acre sown in April is fine. Red cabbage is also popular and is grown as above.
Winter cabbage: – Sow seed end of April/early May and plant out June/July spaced as above. Tundra is a reliable and very hardy variety as is January King. Savoy’s such as Ormskirk are still good.
Spring cabbage: – Sow seed last week of July/first week of August and plant out 12” apart during the first half of September. From February onwards use every other plant as spring greens and leave the others to form a heart. I found Durham Early and Wheelers Imperial good varieties.
Brussels Sprouts
If they are to produce a decent crop brussels sprouts do need firm well prepared ground and a long season of growth. I therefore, sow seed mid-March and aim to plant out by the end of May or early June allowing 75 to 90cm between plants and 90cm between rows. Planting into soft ground that has recently been dug or rotavated invariably results in plants producing loose sprouts, planting too late can result in loose sprouts or even blind plants, i.e., stalks and leaves but no sprouts.
Some varieties of brussels sprouts crop as early as September but I avoid these as there are so many other vegetables available at that time. Later varieties such as Brodie, Brendan and Content crop from November and well into the New Year and produce good results. Late winter/early spring when most sprouts have been picked the tops are very useful as spring greens. Generally, I find the plants support themselves but if they grow particularly tall it is worth staking them
Calabrese
Often referred to as broccoli, this is a superb brassica that needs a bit more work but deserves to be more widely grown; I grow three batches with sowings in late January, March and late April/early May. Transplant about 60cm between plants in ground prepared and fertilised as above, early transplanting’s might need frost protection. Once in the ground keep well-watered, when the small head of broccoli is seen which in effect is a flower bud start feeding the plant each week with liquid Miraclegrow, the higher nitrogen in this fertiliser helps build the plant and the potash helps produce the head. The heads can get quite large; cut them well before they produce yellow flowers. Once the head is cut leave the plant in the ground, keep it watered and continue feeding each week, this will encourage more side shoots to develop from the leaf axials which in turn will produce a succession of smaller very tender heads. Aim to cut the heads while they are still tight. Grown this way the plants continue cropping for several months. From my three sowings I normally crop it continually from early June until December. I have found Marathon (most seed merchants) a good variety. Very good steamed, this is one vegetable where your own produce will be vastly more tender and superior than anything you can buy in a shop.
Sprouting Broccoli
There are varieties that crop during the summer and autumn; however, I have plenty of other vegetables at these times so grow sprouting broccoli for the early spring period otherwise known as the hungry gap. i.e., March/April.
Seed is sown during May, planted out June/July with 90cm/3’ between plants.
By late winter, the pigeons are ravenous and unprotected plants will be ruined very quickly. So, as the spears develop ensure your plants are well covered under netting supported above the crop.
Purple Sprouting, Red Arrow and Claret all perform well
Cauliflower
These can be grown to crop during the summer however as I grow quite a bit of calabrese I purposely grow cauliflower to head in the autumn, winter and spring. Most of mine are sown during April and May and planted out about 60cm apart each way.
A planting of the same variety of cauliflower normally results in all of them coming together, there are two ways to overcome this: –
a) If say nine plants of the same variety are being grown their cropping time can be staggered by planting out in three batches of three about ten to fourteen days between each batch.
b) Alternatively grow different varieties that crop at different times.
I do the later and aim to have a few cauliflowers most months from autumn through to April. Most seed catalogues give the cropping times for the varieties they list-
Exactly when cauliflowers head can be unpredictable however as a guide, Clapton for August/ September, Cendis for November, Triomphant for December/January, Dionis for February, Snowmarch and North Foreland for March and Aalsmeer for April. Generally, three or four of each variety is adequate.
If you grow winter heading cauliflowers it is helpful to plant them near to paths so you can check them regularly. As when approaching cropping the foliage with some varieties often curls over and conceals the curd so as to protect it from cold weather. If curds are ready during cold weather they can be protected for a few days with fleece.
Kale
At one time kale was often considered cattle feed but in recent years has become far more popular, probably due to recognition of its high nutritional value and popularity with celebrity chefs. A very useful autumn and winter crop.
Sow seed during late spring, plant out early summer about 60cm apart each way.
Curly kale such as Reflex and Dwarf Green Curled are very hardy.
Italian kales such as Cavolo Nero, Black Magic and Nero di Toscana are very popular and versatile. Although Italian kale is very prone to white fly which accumulates under the leaves a mild infestation can easily be washed off with clean running water.
A final tip. Winter brassicas are crucial in providing year-round crops but the later varieties do occupy the ground through until spring. Winter cabbage and cauliflower can be cleared and the ground forked over as they finish so that come April only late cauliflower and sprouting broccoli is left. This ground will be compacted as a result of winter rain and winter harvesting but it is a bit late to dig and rotavating will release winter borne moisture. So, I find it easier to rotate so that the brassicas are followed by potatoes the cultivation of which then breaks up the ground.